Sunday, August 16, 2015

Melted Silk

Any of you who read my post on toasted scarves know that I like to post my fails as well as my successes.  Learn from my mistakes!

Here's what happened.  I had a square of silk which I had dyed dark brown with the idea of experimenting with resists.  The silk did not react as I expected it would, so I thought I should up the ante.  In the previous I had used a 50% solution of bleach.  This time I went up to about 80%.

I folded the silk and clamped it between two jar lids, shibori style.

Then I submerged it in the bleachy solution.  I was initially pleased, because I could see that the exposed fabric was finally losing its dark color.  On second thought, however, I wondered what was going on to cause the clamped fabric to foam.  Look carefully: That was a glassy surface before I dunked the bleach in.  Now it looks like it's boiling!


Oh, well.  I remove the fabric and rinse it in plain tapwater.  The color is gorgeous!


Unfortunately, when I opened it up, I discovered that the bleach solution had damn near dissolved the silk  It came apart in my hands as I was spreading it out to see the results!


Note to self:  When working with silk, leave the bleach at home.  

Household Bleach and Plants Resist Experiment

This is one of two experiments I made with resists.  In the first one, I was comparing products specifically designed for drawing on fabric versus plain old Elmer's washable glue.  Guess who won?

Today, I overdyed the rayon napkin of the previous experiment, and also dyed a square of silk and a linen napkin.  I decided to work with the silk and linen.  The silk is on the left.


Again, for the purpose of a quick and dirty experiment, I used dark brown Rit dye. A quick bike ride around the neighborhood yielded several more-or-less two dimensional bits of greenery to work with.


Using a 50% solution of bleach in water, I proceeded to lightly spritz the fabric.  The linen quickly began to react to the bleach.


The silk, not so much.  I thought I saw a shadow of some of the vegetation after I lifted it up, but what I was actually seeing was just a dry spot versus a wet spot.  The silk did not react to the bleach solution at. all. 


Not that this discouraged me... I put the silk aside to play with later (with less than spectacular results).

Now remember how I said I overdyed the rayon napkin I had used in the previous resist experiment?  Well, it's sitting there on the driveway, and I'm sitting here with bits of vegetation with a light misting of bleach on them... so... 


I took the bleachy greenery, put it on the napkin, and pressed it with my hands for a second.  The results were instant and far more satisfying!

What I learned:
  • A 50% bleach solution is strong enough.
  • Less moisture on the foliage worked better than more.  It gave it more of a ghostly appearance.
  • I liked the wispy/frilly vegetable matter better than the solid/heavier prints.
I'd love to hear what you come up with... Remember, the joy comes from the creative process just as much as from the results.


A Comparison of Resist Products

Lately Elmer's glue (especially the blue gel type) is all over the internet in crafty circles.  I've been wanting to experiment with resists, so I thought I'd try a few and compare them for you.  An online search produced actually very little.  Here is what I came up with:
  1. Tulip Tie-Dye Resist ($5.99 on Amazon for 4 oz)
  2. Pebeo Gutta Water-Based Colorless Gutta ($3.85 from Dharma Trading Co. for 20 ml)
  3. Washable Elmer's School Glue ($.50 from Walmart for 4 oz).

In applying this to a dry rayon napkin, I noted the following:
  1. The Tulip resist is difficult to work with.  It's the texture and stickiness of glue coming out of a hot glue gun.  When you lift the applicator up, the fabric wants to come up with it.  
  2. The Pebeo is lovely to work with.  It comes out much thinner, and has a more watery consistency.
  3. The glue is, well, glue.  It was somewhere between the others in terms of ease of use, and the applicator left something to be desired.  If I do end up deciding to work with it, I will transfer it to a container with a better applicator.   


Something I noticed almost instantly, however, is that by the time I finished writing with the Elmer's glue, the Pebeo had "spread," meaning it absorbed into the fabric.  Perhaps this is why it had such a teeny-weeny applicator.  Perhaps I should have used it more sparingly!

Before I show you how it looked after drying overnight, let's look at the instructions for these three:
  1. Tulip says: Apply to fabric by brushing or squeezing on (I cannot begin to imagine the mess brushing would make--remember, spreads like melted hot glue).  Let dry completely.  Dye fabric (presumably with Tulip Tie-dye).  Let set 6-8 hours.  Wash inside out in hot water to remove Tye-Dye Resist.
  2. Gutta by Pebeo: See leaflet.  Shit!  Tossed leaflet!
  3. Elmer's glue: There are no instructions for using as a resist, but this from the Elmer's website on how to remove dried glue from fabric.  When dry, do not use hot water, dry cleaning solvents, a hot drum dryer or iron before the removal of the adhesive is complete, as they can fuse the adhesive film irreversibly, making removal impossible. Soaking in room temperature water for 24 hours or longer will help to redisperse or soften the film. After soaking, wash the fabric in a normal wash cycle and allow it to dry at room temperature. 
So when I woke up this morning, this is what the dried resists looked like:


The Tulip resist shrunk as it dried. It had a plastic sort of feel to it.  It also continued to spread.  The lines of the "T"  no longer meets at a right angle, the "u" has merged with the "l" and there is barely a hole in the "p" any more!  


The Pebeo gutta lay very flat and had a nice hand for working with.  


The Elmer's glue looked like, well, dried glue.  A little stiff, and the larger areas did curl up on themselves a bit like the Tulip did.  Overall, however, it did not spread like the Tulip did.

Next, to a dark brown dye bath.  For the purposes of this experiment and for the sake of ease, I used dark brown Rit dye.


I was worried that giving the fabric a long hot bath in the dye would begin to remove the resist, but since I work with heat, I needed to try it with heat. 

Pulling it out of the dye bath, this is the initial look:


Next, I hand-washed the fabric in warm water.  


The Tulip resist was very difficult to get out.  Maybe after a run through the washing machine it would be better, but that's not practical for when I'm dyeing with naturals.  Also, you'll notice that the dye looks like it seeped in around the edges.  On closer inspection, it looks like the resist worked best where it permeated the fabric though and through.  Which clearly wasn't everywhere.  


The Pebeo gutta is almost as if it weren't there at all.  I'm thinking this might have to do with the heat of the dye bath?  I believe the Pebeo is intended more for fabric painting.  It's an interesting effect, if you want a "suggestion" of a resist...  


The Elmer's glue had some of the same problems as the Tulip resist, in that where it was not spread the thickest, or where it didn't soak all the way through, the dye got through.  Something to think about if you don't like the batik look...


THE WINNER: ELMER'S SCHOOL GLUE


  • It was the cheapest by far
  • It can be purchased just about anywhere
  • It stays where you put it
  • When applied thickly enough, it resists nicely
  • It washes out easily
But that's not the end of the resist experiment... check out the experiment with household bleach and neighborhood plants!  ...and learn from my mistakes!

Saturday, August 15, 2015

Bundle Dyeing and Flower Pounding: A tutorial

This is a slide-show presentation I created based on a bunch of research I did this past winter.  If you enjoy the information you're finding here, jump over to my Pinterest to see more of it!


My only regret is that I didn't jot down the names of the books I got this information from!  Which I hope doesn't mean I'm plagiarizing... I openly admit that I didn't come up with this stuff!  It's from books I found at the Rochester Public Library, Rochester, MN.

Monday, July 20, 2015

Pounding then steaming

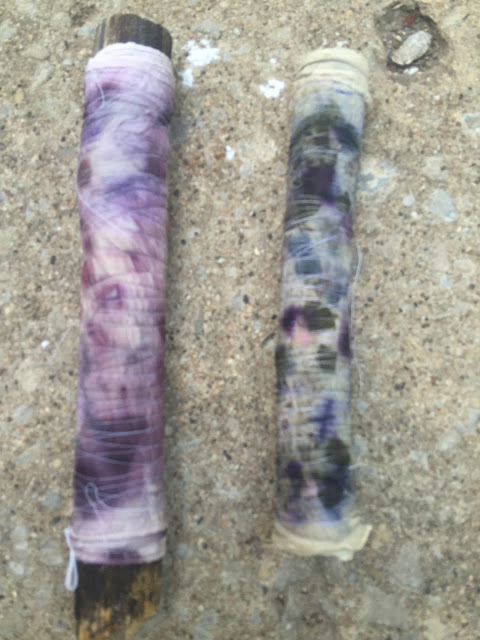
I started by pounding some flowers and leaves on scarves, but when the results were less than spectacular, I wrapped them up with assorted other flowers on some pieces of branches that had fallen from my tree.


After steaming for an hour or so, this is what I found as I unwrapped them.

If you look closely at the bottom one, you can still see the actual flowers stuck to the fabric.  They took a while to remove.  Next time, I'm using a toothbrush to get them off.


Pressed to set the colors, then washed to rinse off the remaining plant matter (I keep finding little bits of wilted flowers around the house), and pressed again, these are the soft results.


Sunday, July 19, 2015

How to Make Rust

Start with steel wool.  This kind will turn to pure dust when rusted.  I'm going to try with Grade 3 next time, and see if I can get something interesting out of the heavy curl of the steel wool.


I put the steel wool in a gallon size freezer bag in a single layer.


Add some common household vinegar.  


Then I pressed all the air out of the bag and sealed it.  Put it in the sun to begin the process of weakening the fibers.


After an hour, it looks like this:


A little while later, this is what  the vinegar looks like.  I wonder what it would have done to fabric if I'd used this bloody red runoff...


Next, the magic really begins.  Add hydrogen peroxide.  


The reaction is exothermic, so prepare for it to get hot and to foam up.  I had to "burp" the bag several times before I could let it rest.  


After another few hours in the sun, I began to pour off the excess fluid.  This turned out to be pure gold as well.  As a mordant, it will turn yellow to green, green to dark green, and pale blue to intense green-blue. 


After a while I pulled the steel wool out of the bag and left it to dry in the sun.  


After separating the precipitate the fluid in the jar ends up light and honey-colored.  A little goes a long way as an iron mordant.  One quarter cup in a gallon of water is sufficient either as a pre- or post-mordant.


And here is the resultant bag of rust powder.  I haven't decided how to use it yet, but I promise I'll share when I do.  


Rusty Rebar Redux

I mentioned in a previous post that a found piece of rusted rebar made a beautiful scarf.  I tried it again, and this time documented the process a little more carefully.  I wasn't sure there would be enough rust left on the rebar to reproduce the results of the first scarf, but it's all about the creative process, right?

Here is the scarf after sitting in the sun for 5 days.  Doesn't look too pretty.


Unwrapping it reveals a really nasty looking mess.  I do recommend wearing gloves when working with rust.  Anything that effectively stains fabric will stain your hands.  


As you can see here, some parts of the scarf look almost black.  Others look barely light tan.  It's hard to get how this works.  


The scarf is rather stiff when uncoiling it.  The process removed a lot of the thick layer of rust from the rebar and transferred it to the silk.


Pulling the scarf open continues to be somewhat unremarkable.  Pretty monochromatic and not very exciting.


The next steps are to stop the rusting process by soaking in saltwater and washing, washing, washing. 

Here is a side-by-side comparison of the scarf made the first time around and the scarf made with the leftover rust on the rebar.  The one on the right is paler, subtler, but just as beautiful.


Buried rebar makes magic

I was gardening in my back yard and unearthed a foot-long length of rebar, rusted so heavily, where the shovel hit it, a piece of rust 1/16 of an inch thick chipped off.  I hung on to it for a few weeks trying to decide what to do.  I didn't know if I wanted to chip the rest of the rust off of it and use the bits or do something different.


In the end I decided to take a silk scarf, dunk it in vinegar, then wrap it around the rusty rebar.  As I wrapped it, the scarf twisted on itself.  I wrapped it loosely in Saran wrap to keep it from drying out, and left it in the sun.  


At the end of a week, I removed the plastic wrap, uncoiled the scarf, washed it and pressed it.  And I was delighted at the results!  I had no idea rust could do such beautiful things to a plan white silk scarf.  


Toasted scarves

This weekend I had one of those things which you can either consider a fiasco or a "happy accident" to quote Bob Ross.  I put the bundled scarves on the steamer and didn't notice that the water had boiled dry.  I got a little "toasting" on the scarves.

I started with tightly bundled scarves in which I'd sandwiched delphinium (on the right) and bee balm (on the left)


A few hours later you notice the brown bands going across... Dammit!  It also affected the color of the flowers.  I will have to wait until next year (and a new crop of delphinium petals) to see if the true outcome would have been purple or blue.  In the mean time, I will stick to my script:  "I meant it to look that way!" 


Just sayin'... this was not my first oops, and it turned out not to be my last.  

Introduction

We all need to explore our creative side.  The creative process has been a part of who we are as humans since we lived in caves.

My initial venture into the creative process was my garden.  Gardening flowers, then later vegetables, became my therapy.  My sanity.  Back then I also sewed, and created web pages, and wrote.  Although I didn't really associate any of these with creativity, looking back, I understand that this is what it was.

It wasn't until my life settled down enough that I was able to begin dabbling in things that one might consider "artistic" that I realized how important creativity was to my life.  My passion at the moment is dyeing textiles with natural elements: plant matter and rusty things in particular.  I like that I can take elements from my garden (most recently the petals from my blue delphinium and my purple bee balm), wrap them up in silk, and a few hours later unwrap them, and be delighted--or at times disappointed-- by the results.  It's a creative process and a learning process, and the brain is fueled by both.

I hope you enjoy some of the things I'm working on.